
![[How-To] Create an Offering using IBM’s SmartCloud Control Desk](https://www.interlocsolutions.com/hs-fs/hub/98876/file-805130373.png)

.png "Scott Peluso")
In the new IBM SmartCloud Control Desk (SCCD), there are very good Service Catalog and offerings applications that you can take advantage of and use in a production environment. In this blog, Interloc's Pete Morell shows you how to create a Service Catalog offering and add it to a catalog.
(To learn why IBM Maximo Users should consider SCCD, click here.)
He uses some of the existing demo data that comes with SCCD and builds on that data. At the end of the blog post, you will know how to create:
- Classification
- Work Flow
- Communication Template
- Job Plan
- ALN Domain
- Ticket Template
- Offering
Let’s get started
What we need to do is create all of our items needed for the offering first and then create the offering.
Classification
First, we’ll create the classification.
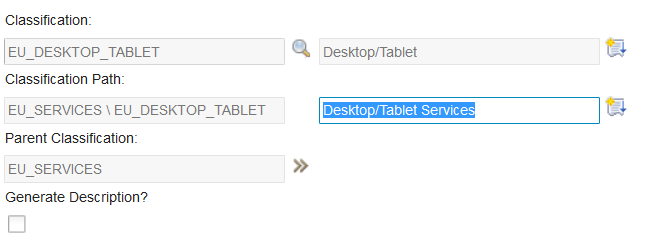
For this go to Administration>>Classifications and search on Laptop.
You should see:

Select the EU_DESKTOP_LAPTOP classification
Once it is selected, create a duplicate of it.
We’ll call this one EU_DESKTOP_TABLET. Here is how you should fill out the fields for the title and description
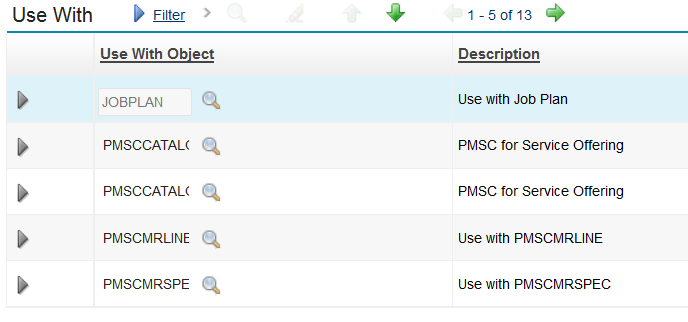
 The “Use-With" records should look like this:
Save the classification.
ALN Domain
We will need this later for our offering. Let’s create it now. Go to System Configuration>>Platform Configuration>>Domains.
Select Add a new ALN domain
Fill in the data as shown and save the domain.
 Job Plan
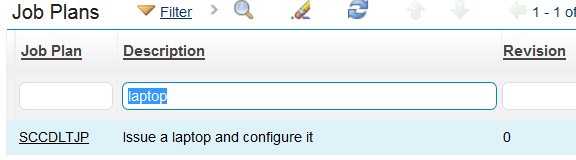
Now that were done with the classification, let’s create the job plan.
Let’s go to Planning>>Job Plans and search for SCCDLTJP, you should bring back this:
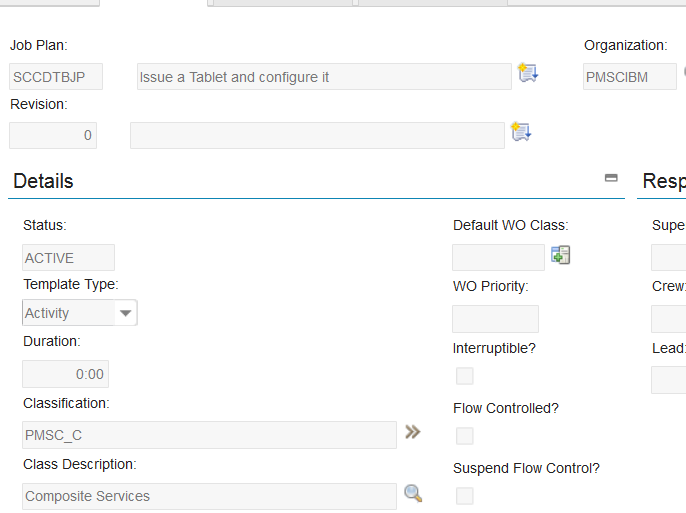
Open it, duplicate it, and change the name and description to the following and then save it and make it active.
Ticket Template
Now let’s go and create the Ticket template.
Go to Service Desk>>Ticket Templates and search for LAPTOPTT. You search should look like this:

Open it, duplicate it, and fill in the details as follows.

Once it’s filled out, save it and make it active.
Let's recap what we’ve done so far. We created:
- A classification
- A job plan
- A ticket template
At this point, we’re about half way thru now. Let’s press on!
Communication Templates
We need to create two communication templates for our work flow actions. Go to Administration>>Communication Templates. Search for SRRESRB and open it, duplicate it, and fill in the data as shown and make it active.
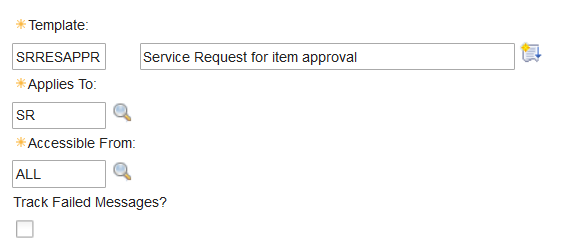
And the message body should look like this:

Save it and make it active.
Creating the second template
See the same template as above, duplicate it and fill in the template as shown:
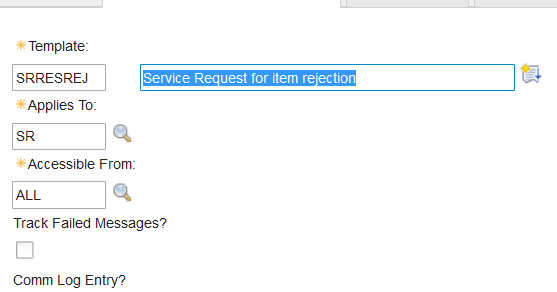
Message body

Save the template and make it active.
Workflow
Now we need to tackle the workflow, which will route the request to the user's manager for approval.
Go to System Configuration>>Platform Configuration>>WorkFlow Designer and search for SCCDLTAPPR. You should see this:
![]()
Open that work flow, your workflow should look like this

Duplicate it and modify it to look like this. We need to remove the MODELB? and @VPAPPR. So yours should look like this:

We now need to add some communication templates to the workflow shown below:

For the action circled, open it and fill in the data as shown:

For the next action circled, open it and fill in the data as shown.

Type in the communication template we created: SRRESAPPR

Now we need one more communication template applied. It goes on the action circled:
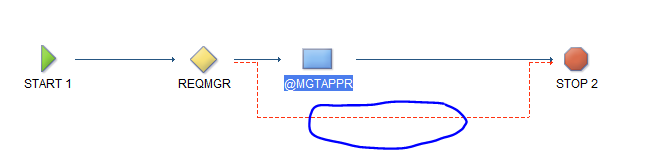
Fill in the action as shown with our other template:
 Save the work flow, validate the process, enable the process, and activate the process.
Creating the offering
Now we can create our offering.
Go to Service Request Catalogs>>Offerings
Search for SCCD_LAPTOP. Open it, duplicate it and fill in the data as shown:

Approvals and Work flow data
Make sure you select the workflow we created under the Line Manager approval and that “Preapproved” is checked for the fulfillment manager. Also, make sure that the ticket template we created is applied.
Now go to the Specifications and presentation tab:
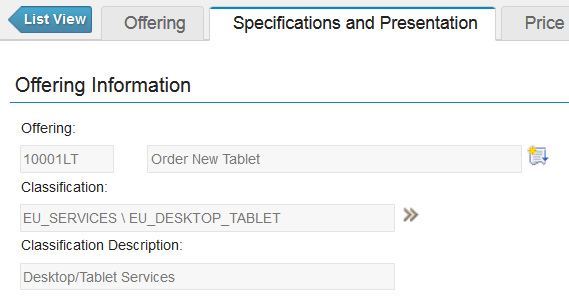
We need to add a data attribute for out tablet but we don’t have one yet, so let's create one.
Under the “More Actions” select the "Add/Modify Attribute" action. Then, click new row and create the data attribute and add the domain we created as shown:

Now add that to our offering as shown:
 Now we need to add the offering to a catalog. Add as appropriate for your application.
 Save the offering and make it active. At this point, you may want to add a graphic for the picture that will show up in the catalog.
Let’s see now how this looks in the catalog.
Go to the Self Service center and go to:
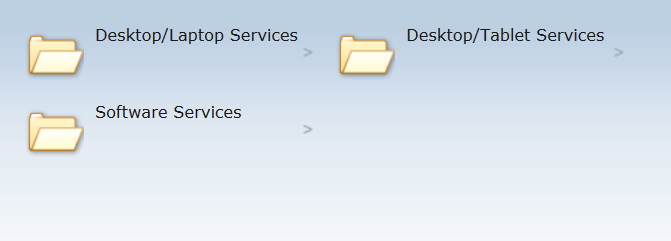
Select Desktop/Tablet services
Select our offering and there it is!
You can go back in and put a price for each model and any other data that you might want.
That wasn't too bad was it? Need answers to your SCCD questions? Contact Interloc today!